Magento is a leading open-source e-commerce platform with an extensive list of features for running and marketing your store, an easy-to-use interface and the ability to completely customize your themes, Magento is a powerful e-commerce platform for those wishing to effectively market their products online.
Note: This tutorial is for Magento 1.5 through to the latest version of 1.9. Version 2 and up are slightly different.
Login to your Magento Admin Panel
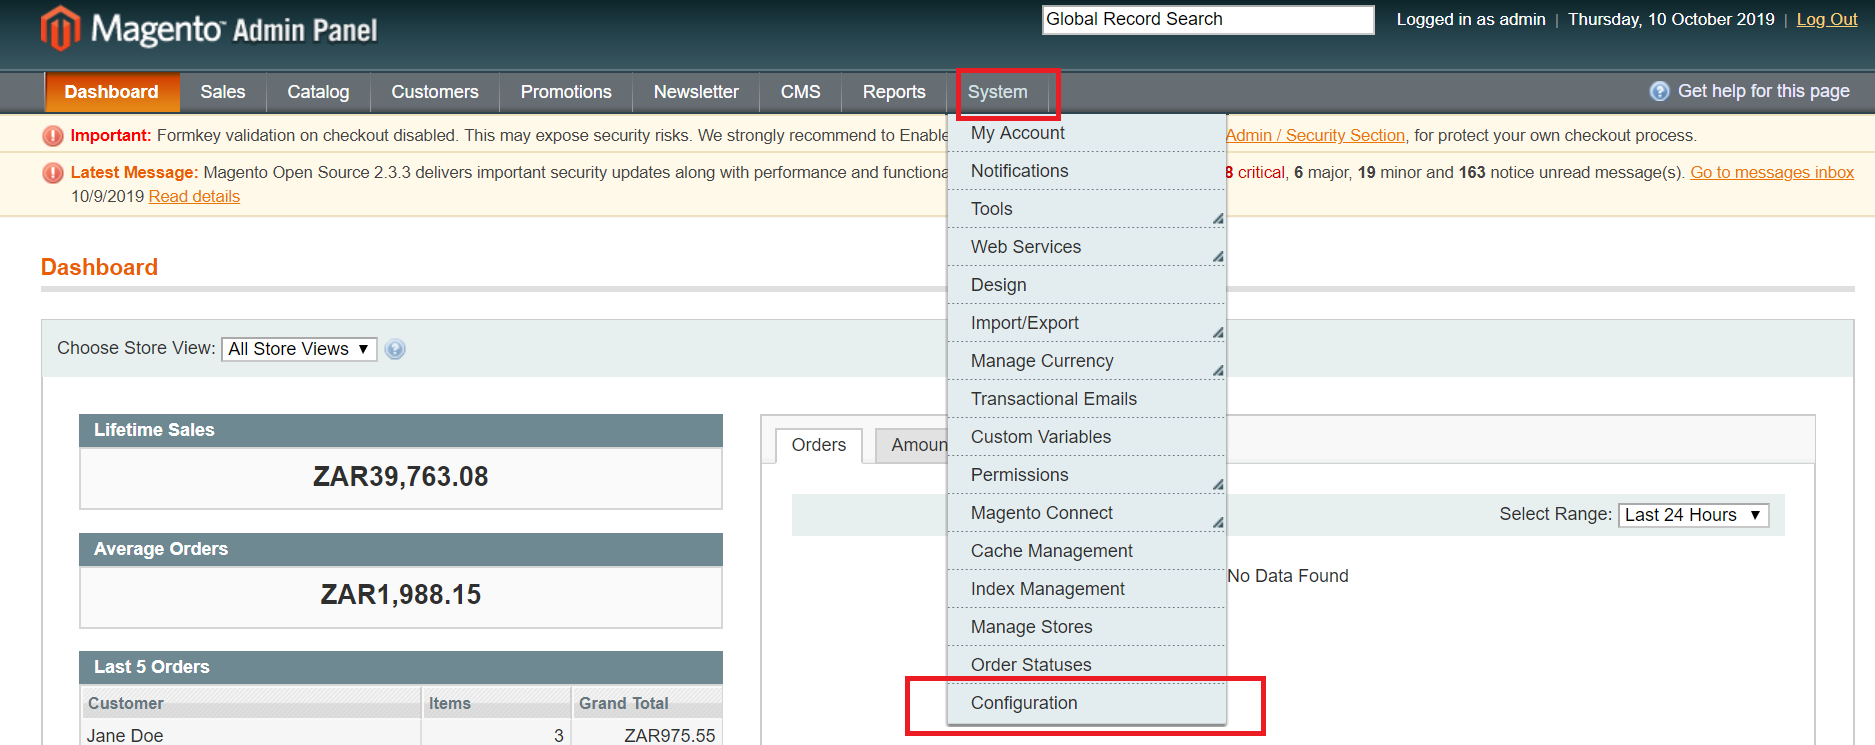
Step 1: From your Magento Admin Panel, click on System and select Configuration from the drop-down menu.
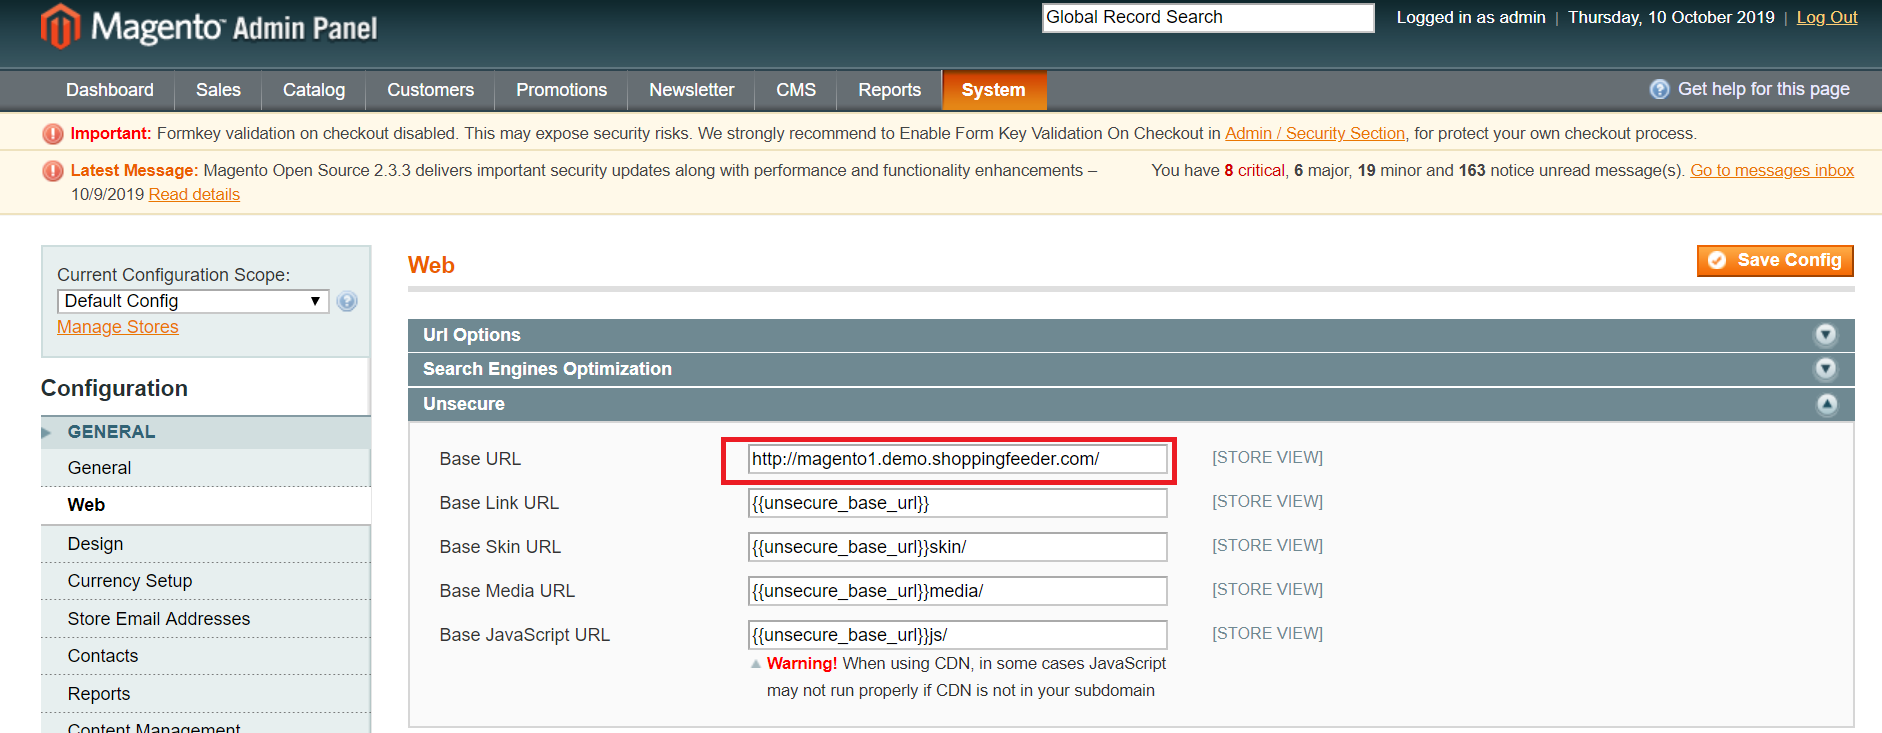
Step 2: From the left menu, select Web then click on Unsecure.

Step 3: Under Unsecure is the URL of you store. Copy this to paste into ShoppingFeeder later.
Step 4: Begin the Setup Process
Once you’ve registered for ShoppingFeeder and signed in for the first time, you’ll be presented with the Setup Wizard. Click Next to begin the setup process.

Enter your store's name, URL, currency your products are sold in, your store's country and category language. If you are unsure of any of the boxes, simply hover your cursor over the '?' icon for a description of the required information.
Paste in your store URL, which you copied from the admin panel earlier, and select the appropriate shopping cart platform- Magento. The setup process differs according to platform, so make sure you select the right option. Then click Next.

- Enable Variants: This field creates separate offers for each variance in your inventory. If you have a shirt that is available in three different colours and Enable Variants is turned on, ShoppingFeeder will create three unique offers.
- Rename Variants: By turning this on, ShoppingFeeder will append the variant name to the end of the product title e.g. Evening Dress / Red / Size 32.
Also enter the weight units of your products (kilograms, ounces or pounds) as well as your shipping charges, product conditions and store description. Then click Next.

Click on Click here to get the plugin/module to download the ShoppingFeeder plugin. This will open the Magento marketplace.

Here you can search 'ShoppingFeeder for Google Shopping.' Choose your store version from the drop-down, then add to cart. 
Head to your cart to go through the checkout process (the plugin is free, so no payment information is required). Once you have entered your details and the purchase is complete, click on install.

You will then get the Magento Access Key, as shown below. Copy the access key to paste into ShoppingFeeder.

Now head back to ShoppingFeeder. Copy the API Key and API Secret as instructed, then click Next.

Go back to your Magento admin panel and go to System > Magento Connect > Magento Connect Manager.

In the connect manager, under Install New Extensions, past the Access Key you copied earlier. Then click Install.

Step 9: Subscribe to channels
Go back to ShoppingFeeder, where the app will check the installation process was successful. Click on Check if installed.

Once the check is complete, the wizard will take you to the next phase to subscribe to channels. Your products will begin syncing in the background. To get your product listings on the desired channels, type the channel name in the Search box and check the box next to the channel you which to subscribe to. Then click Next.

Step 7: Channel setup
Next you must configure your settings for the subscribed channels. Select which products you want included in your feed (All products, products in stock, out of stock and/or pre-ordered). You may leave the utm boxes empty for the moment, as you can always modify these channel settings from the dashboard later. Then click Save.

The Setup Wizard will confirm your channel setup. Now click Next.

Step 8: Complete setup process
You have now successfully set up your store! ShoppingFeeder will show you a list of subsequent steps to take to ensure your product listings have all the correct information. Click Finish.

Now that you've completed the Setup Wizard, you can follow the Platform Tour to guide you through the dashboard features. Simply click on the grey arrow to navigate.

Once you've gone through the Platform Tour, you'll see on your dashboard how many of your products are imported e.g. the box below reads "1 Products Imported." You will also receive a confirmation email to notify you of product imports.
In the top right hand corner, click on the Setup box to see a checklist of steps to follow to create your feed.

Your Progress Checklist will tell you the percentage you've completed and give you a list of tasks to complete. Simply hover the cursor over the '?' icon for more detailed descriptions of each task.

Click on Read More to open the ShoppingFeeder help blog for detailed guides on each part of the checklist.

Now your Magento store setup is complete!
Was this article helpful?
That’s Great!
Thank you for your feedback
Sorry! We couldn't be helpful
Thank you for your feedback
Feedback sent
We appreciate your effort and will try to fix the article